> ## Documentation Index
> Fetch the complete documentation index at: https://docs.clairelabs.ai/llms.txt
> Use this file to discover all available pages before exploring further.
# Annotate student submissions with highlights and notes
> Learn how to navigate Blocks, add highlights and notes, approve AI suggestions, and use keyboard shortcuts for a faster annotation workflow in Claire.
Annotation is the core of your review workflow in Claire. As you read through a submission, you navigate between content Blocks, highlight strengths and weaknesses, add notes, and work with AI suggestions — all without leaving the document. Use keyboard shortcuts to move quickly, or use your mouse if you prefer.
Carefully review all AI suggestions, as they can catch details you might overlook on a first read.
## Annotation workflow
Use the ↑ and ↓ arrow keys to move between Blocks. The Block you're currently focused on is indicated by a Focus Bar on the left side of the document.
Apply a highlight to mark a Block as a strength, weakness, or neutral observation:
| Key | Highlight | Meaning |
| ------------ | ---------------------------------- | ---------------------- |
| a | Green | Strength |
| d | Red | Weakness / shortcoming |
| s | Gray | Neutral |
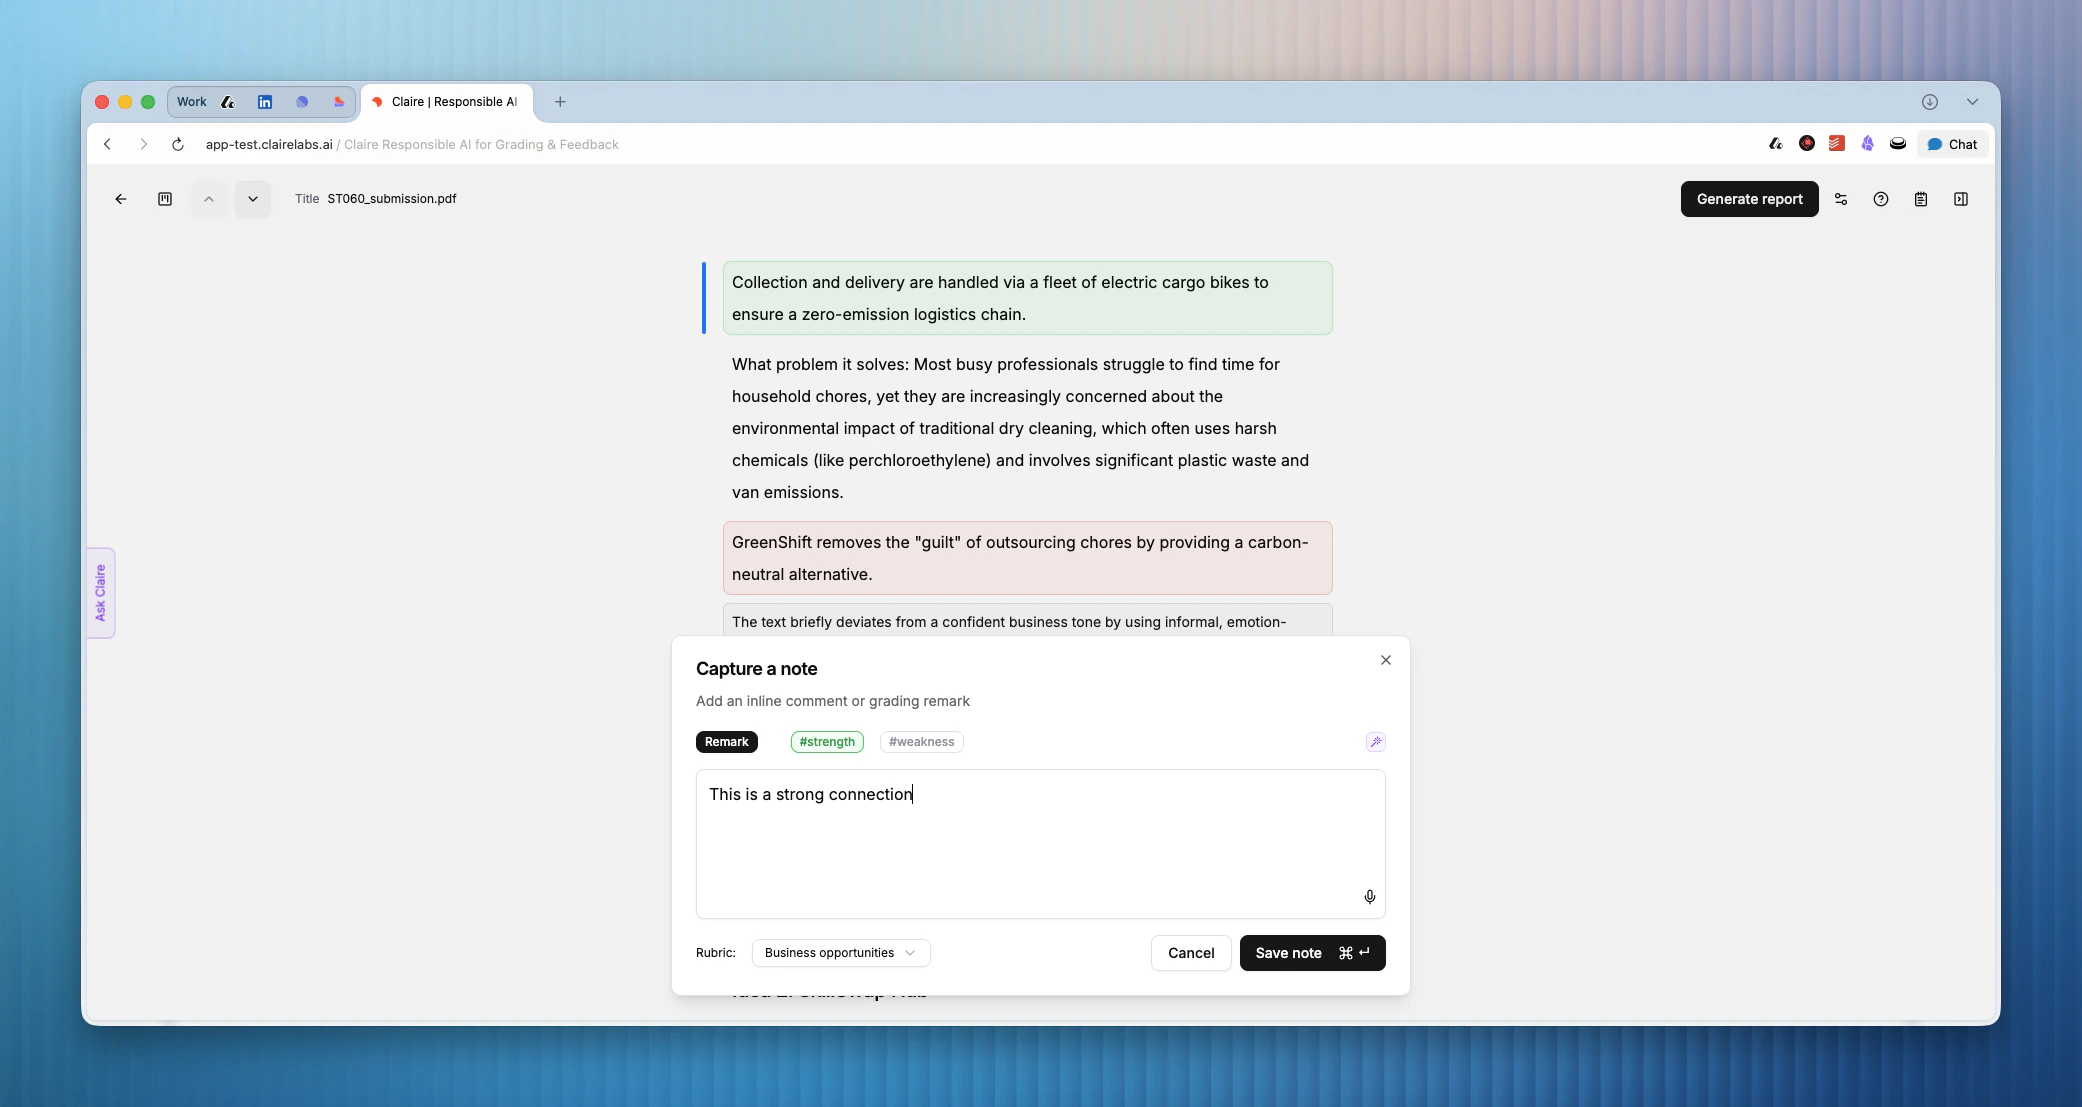
Attach a note (press n) to any Block to record your observations:
* **Comments**: Appear only in the feedback report — useful for narrative feedback you want to share with the student.
* **Grading remarks**: Link a note directly to a rubric criterion. Grading remarks show up in both the grading view and the feedback report.
 If you want to dig deeper into the difference between the two, expand the sections below:
Comments are the default note type in Claire. Every note you create starts as a Comment. They are designed for feedback that falls outside the scope of your grading rubric — observations about writing style, formatting preferences, or any other contextual remark that does not map to a specific criterion.
**How they appear**
Comments display inline, directly below the Block you are focused on. They are visible to the student in the final [feedback report](/grading/student-feedback-reports).
**What they do NOT do**
Comments are not grading-relevant. Claire does not include them when mapping your notes against the rubric or calculating an indicative score.
**When to use them**
Use Comments when you want to share an observation with your student that your rubric does not cover. For example, if writing style is not part of the rubric but you still want to mention it, a Comment is the right choice.
Grading Remarks are notes that are directly tied to a rubric criterion. Unlike Comments, they carry a **sentiment** — either **Strength** or **Weakness** — which Claire uses when generating your grading report and indicative scores.
**What they do**
When you [generate a report](/grading/evaluate-students), Claire maps all your Grading Remarks against your rubric criteria to check that your final grade aligns with the feedback you have written. All AI suggestions Claire creates are Grading Remarks linked to a rubric criterion.
**When to use them**
Use Grading Remarks for any observation that is directly supported by your grading rubric. If a criterion covers critical analysis and you notice a student making a strong argument, that is a Grading Remark (Strength).
**How to create one**
1. Add a note to a Block by pressing n.
2. In the bottom-left corner of the note dialog, open the criterion dropdown and select the relevant rubric criterion.
3. Set the sentiment to **Strength** or **Weakness**.
Once you link a criterion and add a sentiment, the note becomes a Grading Remark.
Claire reads your instructions and grading rubric, then analyzes each student submission to identify potential strengths and weaknesses. These AI suggestions appear inline as you read through a document, as well as at the end of the document or each section if you have split the assignment into exercises or groups.
A green or red bar on top of the Focus Bar indicates that a suggestion is present for the Block you're currently focused on.
| Key | Action |
| ---------------------- | ------------------------------------------------- |
| → | Expand / view an AI suggestion |
| ← | Collapse an AI suggestion |
| Tab ⇥ | Approve — adds the suggestion to your annotations |
| Backspace ⌫ | Reject — permanently hides the suggestion |
Alternatively, switch to the [Rubric view](/documentation/reader/rubric-view) to review all suggestions organized by criterion.
Click View Blocks below any suggestion to open the [References panel](/documentation/reader/reference-panel), which shows all the source Blocks that suggestion is based on. Click any Block in the panel to jump to it in reading mode.
Only suggestions you explicitly approve become part of your grading record. When you approve a suggestion, it is treated as your own grading remark — not as an automated AI assessment. Claire never grades for you; it surfaces insights to inform your decisions.
## Keyboard shortcuts
| Key | Action |
| --------------------------- | -------------------------- |
| ↑ / ↓ | Navigate between *Blocks* |
| a | Green highlight (strength) |
| d | Red highlight (weakness) |
| s | Gray highlight (neutral) |
| n | Add a comment |
| → | Expand AI suggestion |
| ← | Collapse AI suggestion |
| Tab ⇥ | Approve AI suggestion |
| Backspace ⌫ | Reject AI suggestion |
**Looking for more details?**
* To learn how to interact with the document conversationally, see [Ask Claire](/documentation/reader/chat-with-document).
* For a structured, Kanban-style perspective of a submission, see [Rubric view](/documentation/reader/rubric-view).
* To see all your notes and source Block references, explore the [Reference panel](/documentation/reader/reference-panel).
If you want to dig deeper into the difference between the two, expand the sections below:
Comments are the default note type in Claire. Every note you create starts as a Comment. They are designed for feedback that falls outside the scope of your grading rubric — observations about writing style, formatting preferences, or any other contextual remark that does not map to a specific criterion.
**How they appear**
Comments display inline, directly below the Block you are focused on. They are visible to the student in the final [feedback report](/grading/student-feedback-reports).
**What they do NOT do**
Comments are not grading-relevant. Claire does not include them when mapping your notes against the rubric or calculating an indicative score.
**When to use them**
Use Comments when you want to share an observation with your student that your rubric does not cover. For example, if writing style is not part of the rubric but you still want to mention it, a Comment is the right choice.
Grading Remarks are notes that are directly tied to a rubric criterion. Unlike Comments, they carry a **sentiment** — either **Strength** or **Weakness** — which Claire uses when generating your grading report and indicative scores.
**What they do**
When you [generate a report](/grading/evaluate-students), Claire maps all your Grading Remarks against your rubric criteria to check that your final grade aligns with the feedback you have written. All AI suggestions Claire creates are Grading Remarks linked to a rubric criterion.
**When to use them**
Use Grading Remarks for any observation that is directly supported by your grading rubric. If a criterion covers critical analysis and you notice a student making a strong argument, that is a Grading Remark (Strength).
**How to create one**
1. Add a note to a Block by pressing n.
2. In the bottom-left corner of the note dialog, open the criterion dropdown and select the relevant rubric criterion.
3. Set the sentiment to **Strength** or **Weakness**.
Once you link a criterion and add a sentiment, the note becomes a Grading Remark.
Claire reads your instructions and grading rubric, then analyzes each student submission to identify potential strengths and weaknesses. These AI suggestions appear inline as you read through a document, as well as at the end of the document or each section if you have split the assignment into exercises or groups.
A green or red bar on top of the Focus Bar indicates that a suggestion is present for the Block you're currently focused on.
| Key | Action |
| ---------------------- | ------------------------------------------------- |
| → | Expand / view an AI suggestion |
| ← | Collapse an AI suggestion |
| Tab ⇥ | Approve — adds the suggestion to your annotations |
| Backspace ⌫ | Reject — permanently hides the suggestion |
Alternatively, switch to the [Rubric view](/documentation/reader/rubric-view) to review all suggestions organized by criterion.
Click View Blocks below any suggestion to open the [References panel](/documentation/reader/reference-panel), which shows all the source Blocks that suggestion is based on. Click any Block in the panel to jump to it in reading mode.
Only suggestions you explicitly approve become part of your grading record. When you approve a suggestion, it is treated as your own grading remark — not as an automated AI assessment. Claire never grades for you; it surfaces insights to inform your decisions.
## Keyboard shortcuts
| Key | Action |
| --------------------------- | -------------------------- |
| ↑ / ↓ | Navigate between *Blocks* |
| a | Green highlight (strength) |
| d | Red highlight (weakness) |
| s | Gray highlight (neutral) |
| n | Add a comment |
| → | Expand AI suggestion |
| ← | Collapse AI suggestion |
| Tab ⇥ | Approve AI suggestion |
| Backspace ⌫ | Reject AI suggestion |
**Looking for more details?**
* To learn how to interact with the document conversationally, see [Ask Claire](/documentation/reader/chat-with-document).
* For a structured, Kanban-style perspective of a submission, see [Rubric view](/documentation/reader/rubric-view).
* To see all your notes and source Block references, explore the [Reference panel](/documentation/reader/reference-panel).